ios13引入了UIWindowScene类、UIWindowSceneDelegate协议以便支持多窗口功能,但其适用于ipad,不适用于iphone,因为iphone不支持多窗口功能。注意,这里说的窗口不是UIWindow,而是UIWindowScene。
ios13前后的app的UI架构变化
ios13之前的app的UI架构
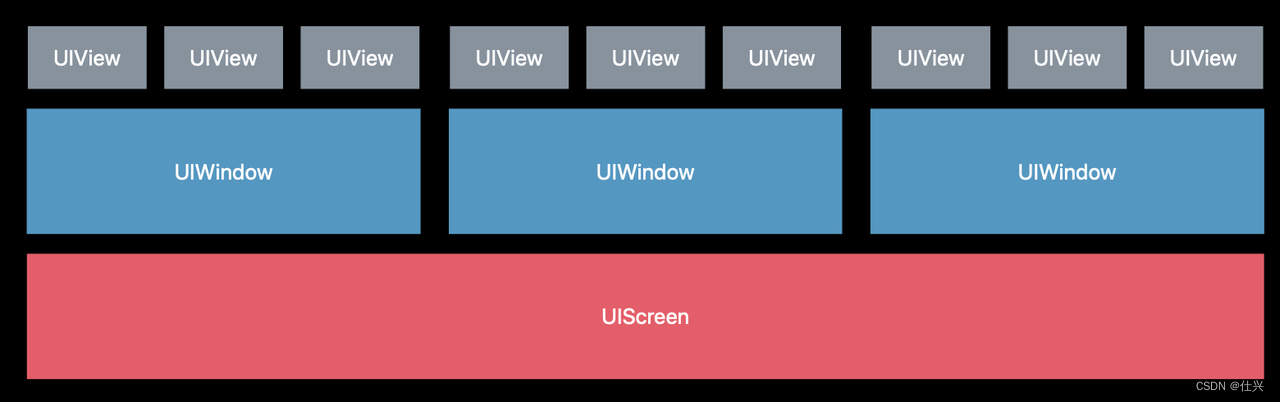
ios13及以后的app的UI架构
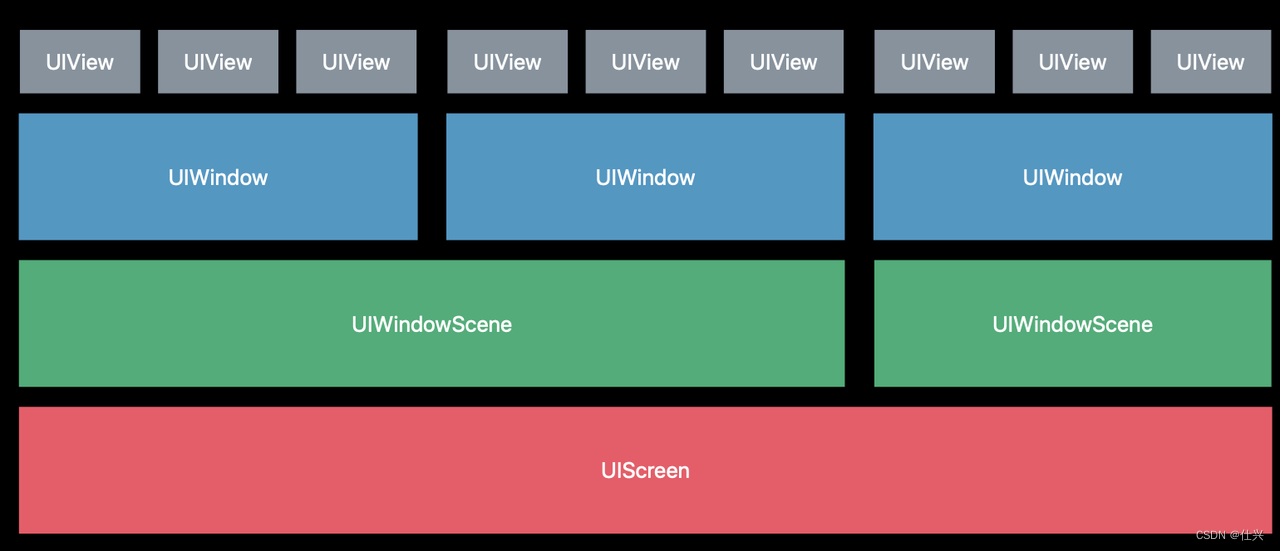
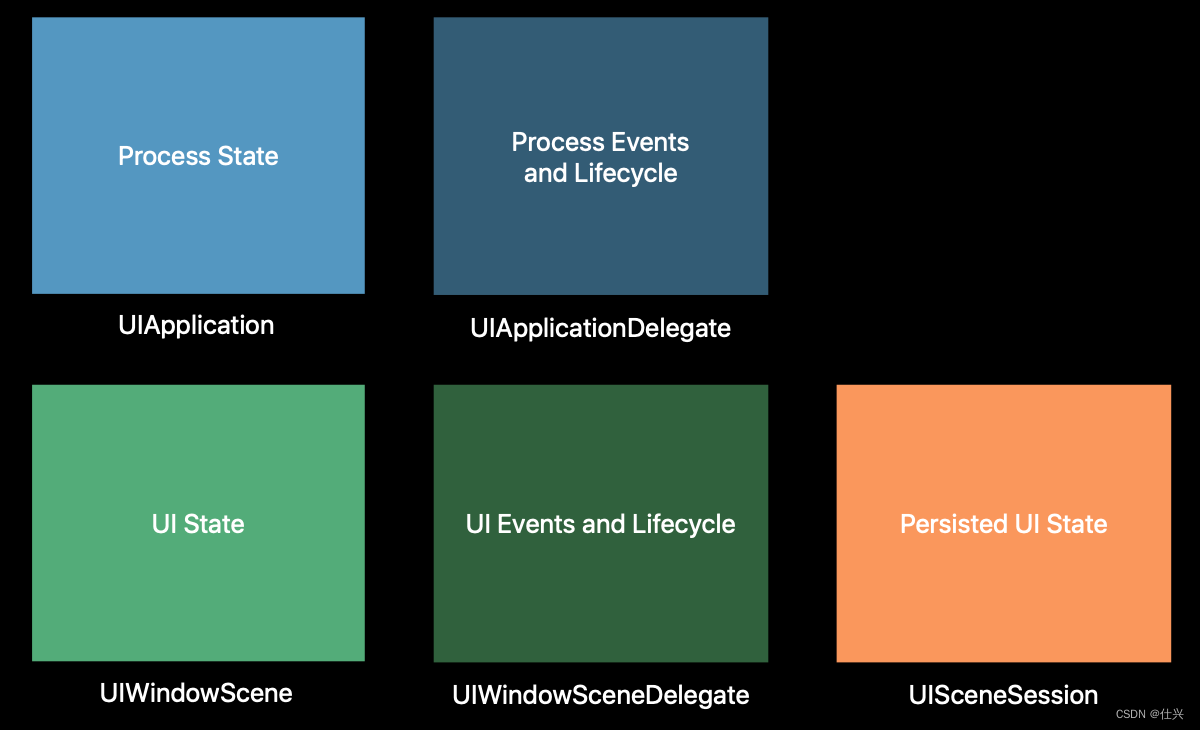
由上图可知,UIWindowScene和UIWindow是一对多的关系。
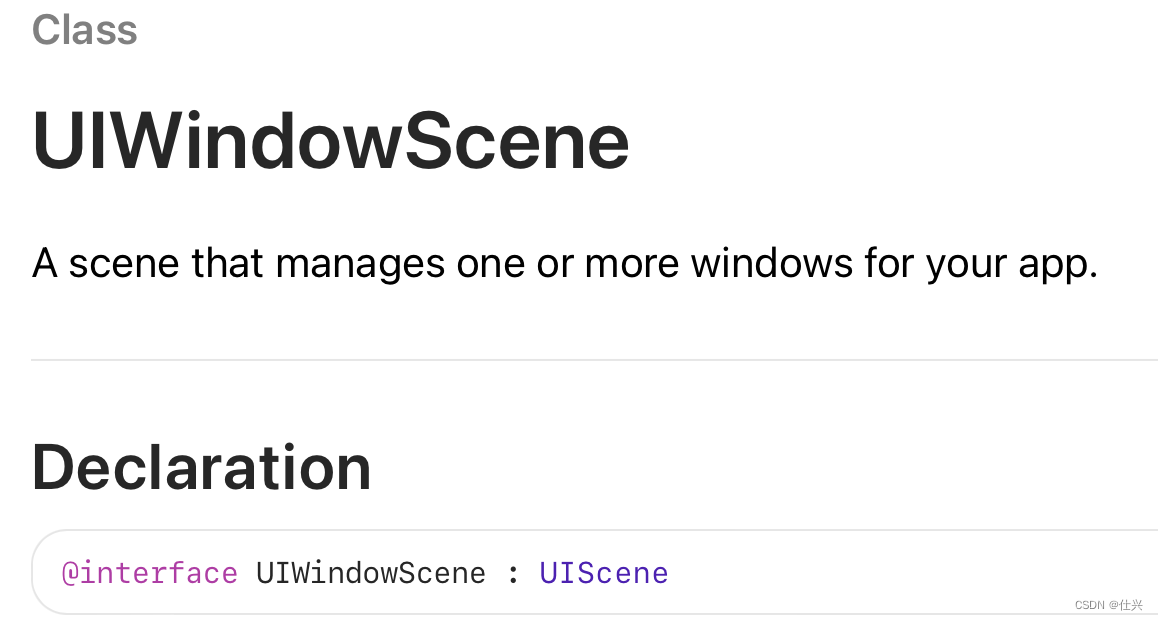
下图所示的是UIWindowScene的定义,它用于管理1个或者多个UIWindow。
第一个app demo
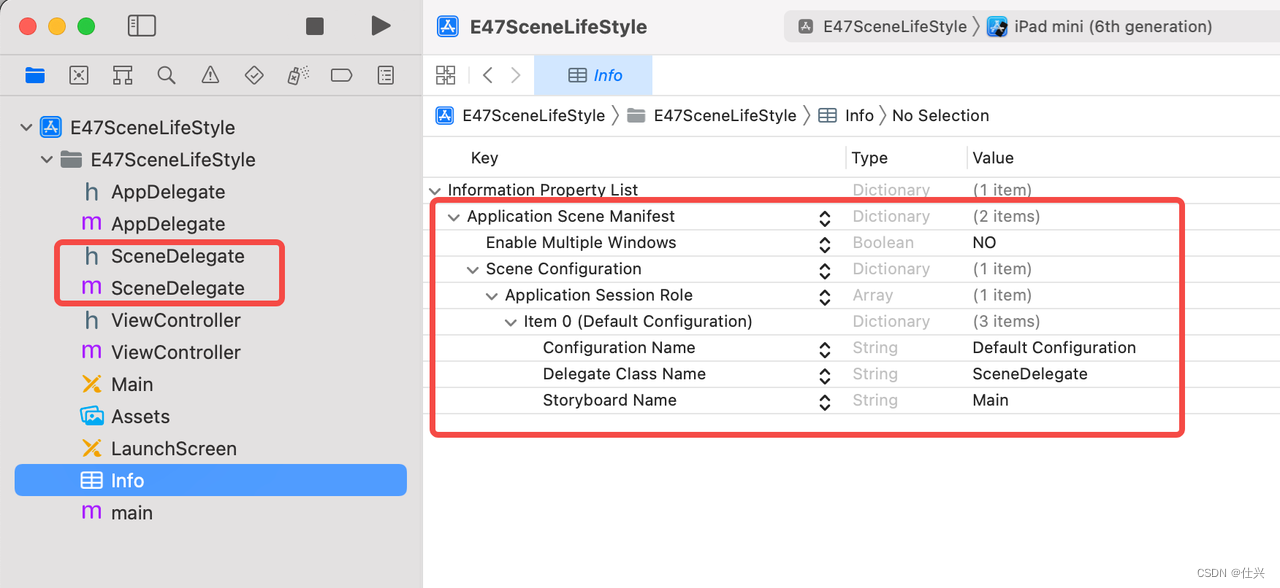
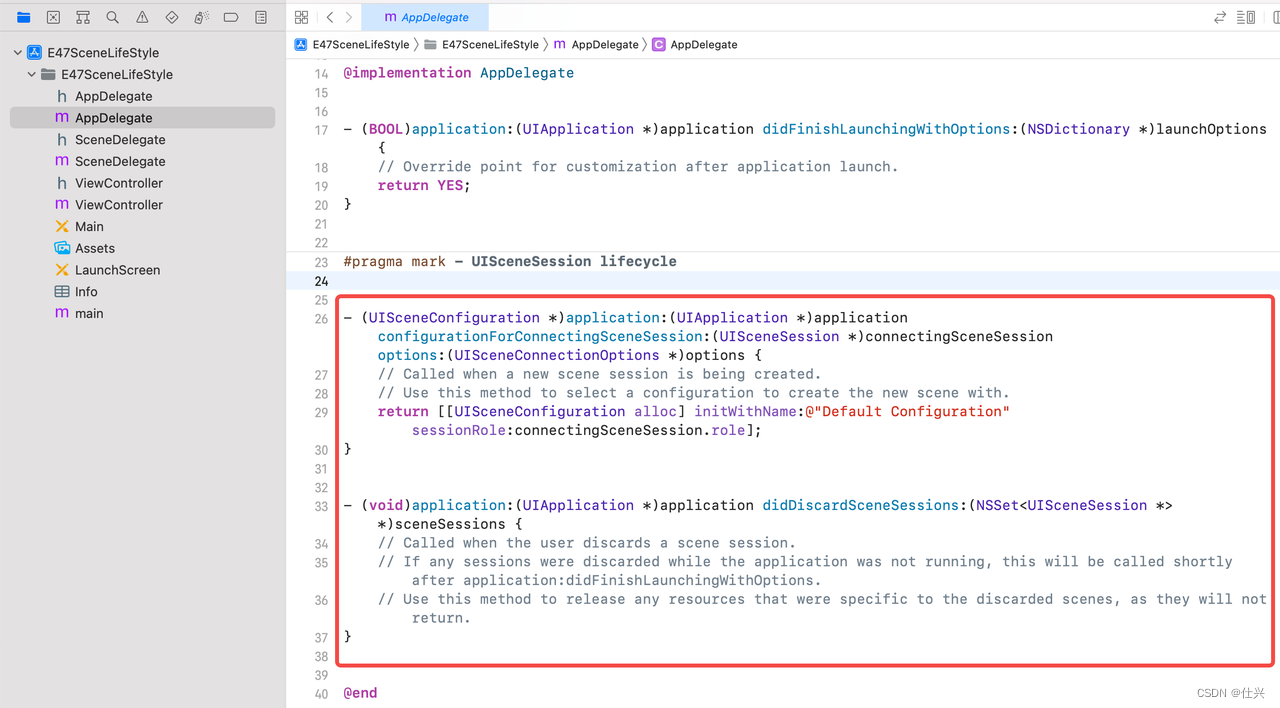
如下面两张图所示,当我们在xcode11及以后的xcode版本中创建一个ios app工程时,xcode会自动为我们创建“一个app运行起来所需”的文件。当创建一个新的app工程时,相比于xcode10及其之前的版本,xcode11之后会自动为我们新增3处内容(如下图的红框所示):①SceneDelegate类;②info.plist里面的Application Scene Manifest配置选项;③AppDelegate类里面的
- application:configurationForConnectingSceneSession:options:方法和
- application:didDiscardSceneSessions:方法。
SceneDelegate类
我们先来看看SceneDelegate类里面的内容,如下代码所示。SceneDelegate有个window属性,说明ios13之后的window由SceneDelegate管理。当看到方法里面的“DidBecomeActive”、“WillResignActive”、“WillEnterForeground”、“DidEnterBackground”时,我们便可以猜测出这是app进入和退出前后台时的回调。
#import <UIKit/UIKit.h>
@interface SceneDelegate : UIResponder <UIWindowSceneDelegate>

@property (strong, nonatomic) UIWindow * window;

@end

@interface SceneDelegate ()
@end

@implementation SceneDelegate

- (void)scene:(UIScene *)scene willConnectToSession:(UISceneSession *)session options:(UISceneConnectionOptions *)connectionOptions {
    // Use this method to optionally configure and attach the UIWindow `window` to the provided UIWindowScene `scene`.
    // If using a storyboard, the `window` property will automatically be initialized and attached to the scene.
    // This delegate does not imply the connecting scene or session are new (see `application:configurationForConnectingSceneSession` instead).
}

- (void)sceneDidDisconnect:(UIScene *)scene {
    // Called as the scene is being released by the system.
    // This occurs shortly after the scene enters the background, or when its session is discarded.
    // Release any resources associated with this scene that can be re-created the next time the scene connects.
    // The scene may re-connect later, as its session was not necessarily discarded (see `application:didDiscardSceneSessions` instead).
}

- (void)sceneDidBecomeActive:(UIScene *)scene {
    // Called when the scene has moved from an inactive state to an active state.
    // Use this method to restart any tasks that were paused (or not yet started) when the scene was inactive.
}

- (void)sceneWillResignActive:(UIScene *)scene {
    // Called when the scene will move from an active state to an inactive state.
    // This may occur due to temporary interruptions (ex. an incoming phone call).
}

- (void)sceneWillEnterForeground:(UIScene *)scene {
    // Called as the scene transitions from the background to the foreground.
    // Use this method to undo the changes made on entering the background.
}

- (void)sceneDidEnterBackground:(UIScene *)scene {
    // Called as the scene transitions from the foreground to the background.
    // Use this method to save data, release shared resources, and store enough scene-specific state information
    // to restore the scene back to its current state.
}

@end
info.plist里面的Application Scene Manifest配置选项
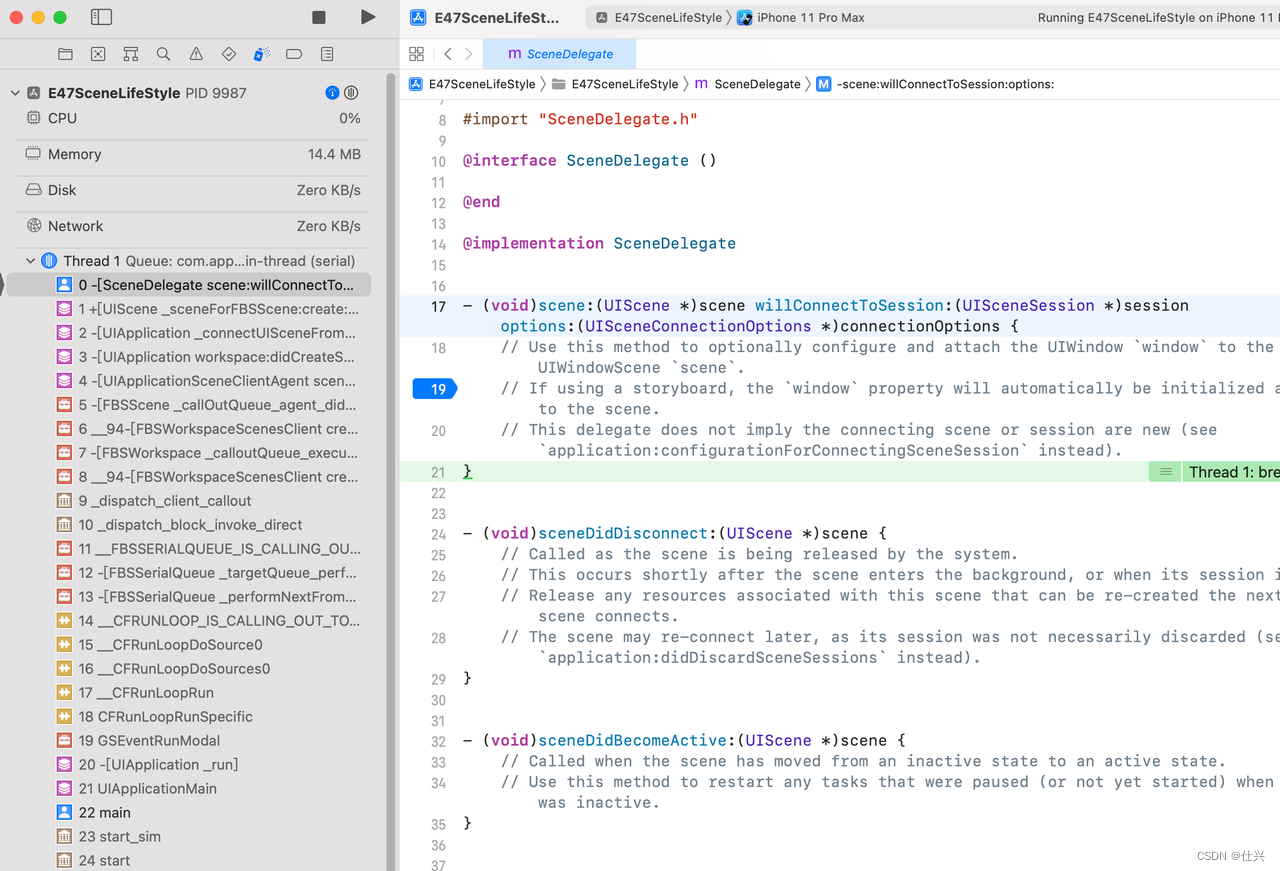
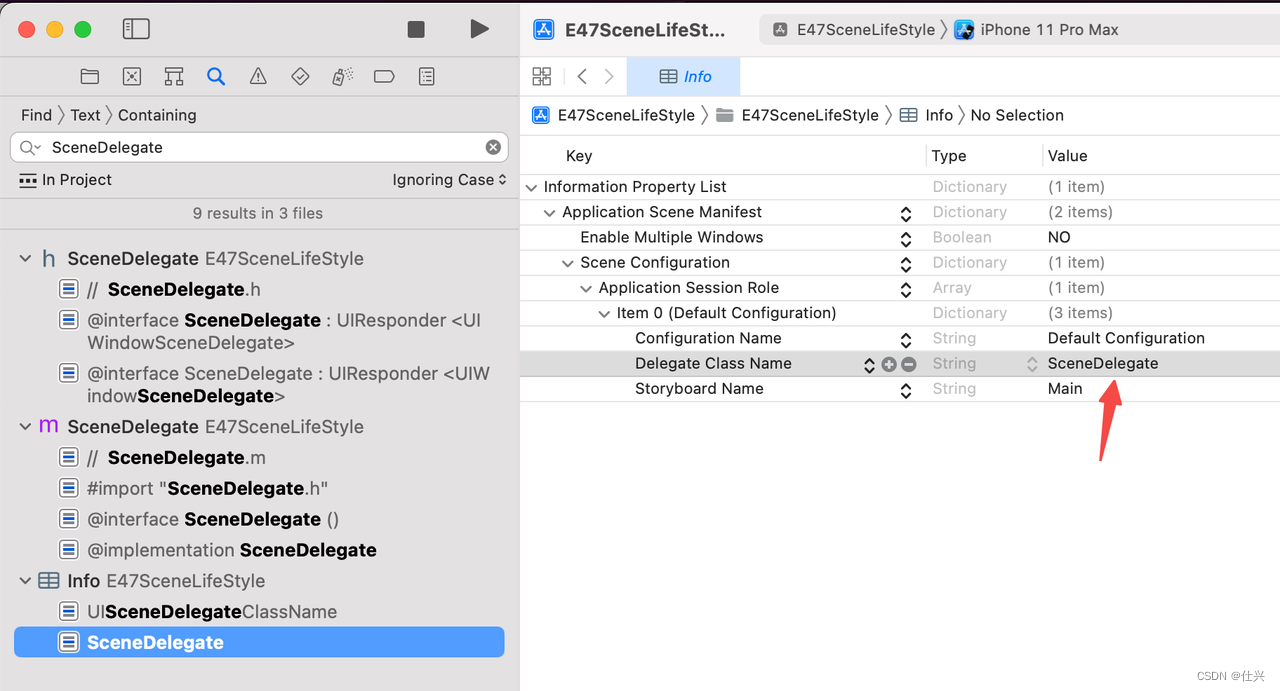
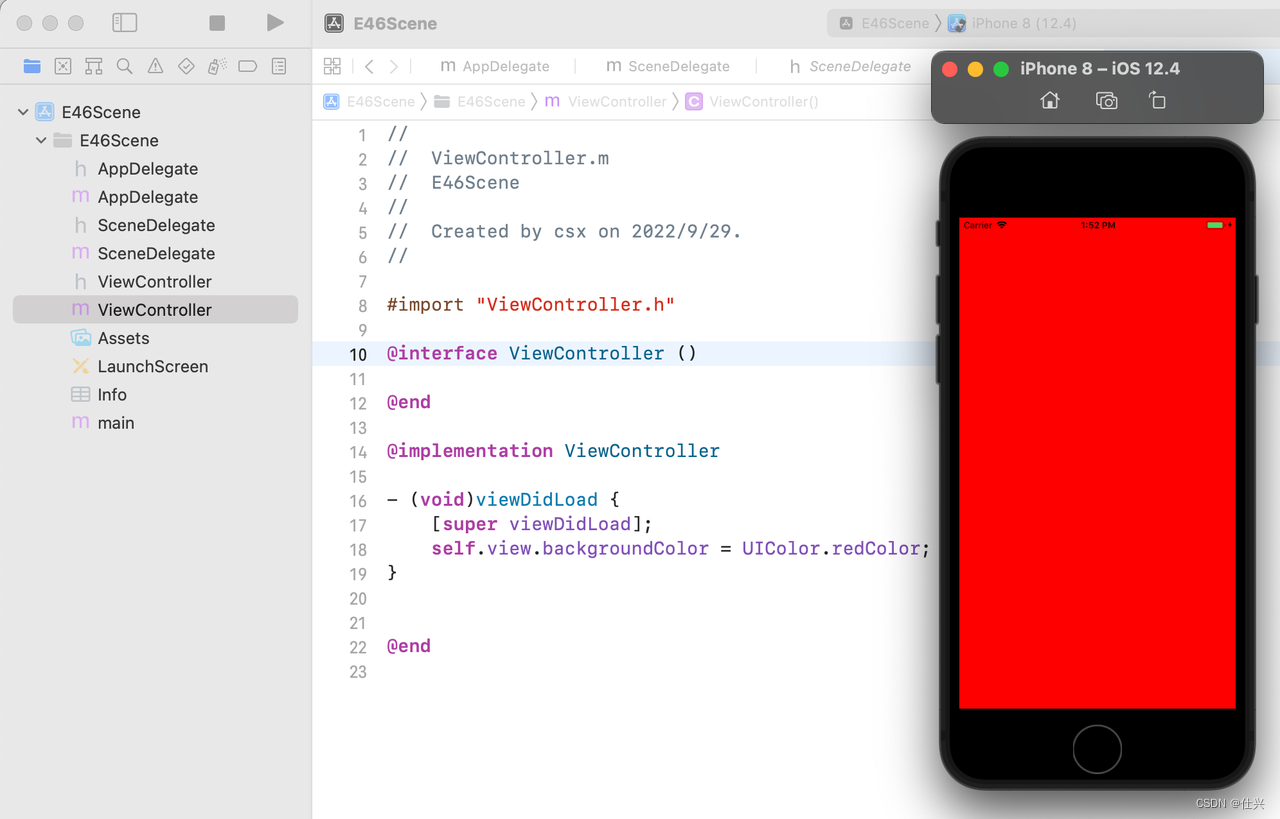
如下第1张图所示,当我们给SceneDelegate类的方法添加断点,然后运行app时,发现断点生效了。那么,SceneDelegate类是在哪初始化的呢?如下第2张图所示,如果你在工程中搜索“SceneDelegate”关键字,就会发现并没有任何代码来创建SceneDelegate实例,此时你可以看到info.plist文件里面有关于SceneDelegate的配置项。我们便可以猜测出SceneDelegate实例是系统默认帮我们创建的。
app demo运行
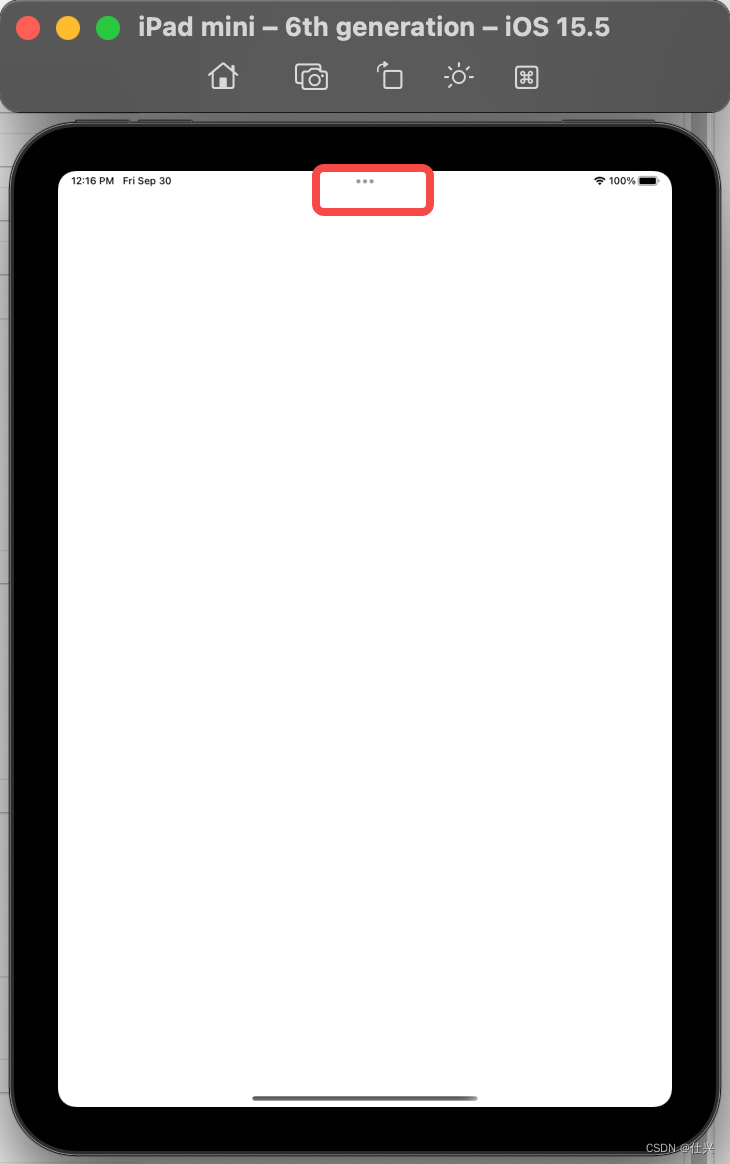
当我们在ipad上运行前面刚刚创建的app时,结果如下图所示,发现屏幕的顶部中间多了个3点按钮(下图的红框所示)。你可以点击3点按钮来使用里面的功能(请看下面的录屏)。
录屏demo链接
UIApplication、UIApplicationDelegate、UIWindowScene、UIWindowSceneDelegate、UISceneSession的职责
xcode11版本之后的xcode创建的ios app如何适配ios13以下的系统
- 在AppDelegate.h中添加window属性。
#import <UIKit/UIKit.h>

@interface AppDelegate : UIResponder <UIApplicationDelegate>

@property (strong, nonatomic) UIWindow * window;

@end
- 在AppDelegate.m中初始化ios13系统以下的情况下的window。
#import "AppDelegate.h"
#import "ViewController.h"

@implementation AppDelegate

- (BOOL)application:(UIApplication *)application didFinishLaunchingWithOptions:(NSDictionary *)launchOptions {
    if (@available(iOS 13.0, *)) {

    } else {
        //适配ios13以下的系统
        self.window = [[UIWindow alloc] initWithFrame:UIScreen.mainScreen.bounds];
        ViewController *vc = [ViewController new];
        self.window.rootViewController = vc;
        [self.window makeKeyAndVisible];
    }
    return YES;
}

#pragma mark - UISceneSession lifecycle

- (UISceneConfiguration *)application:(UIApplication *)application configurationForConnectingSceneSession:(UISceneSession *)connectingSceneSession options:(UISceneConnectionOptions *)options {
    return [[UISceneConfiguration alloc] initWithName:@"Default Configuration" sessionRole:connectingSceneSession.role];
}

- (void)application:(UIApplication *)application didDiscardSceneSessions:(NSSet<UISceneSession *> *)sceneSessions {
}

@end
- 在SceneDelegate.m里面初始化window。
#import "SceneDelegate.h"
#import "ViewController.h"

@implementation SceneDelegate

- (void)scene:(UIScene *)scene willConnectToSession:(UISceneSession *)session options:(UISceneConnectionOptions *)connectionOptions {
    if (@available(iOS 13.0, *)) {
        UIWindowScene *windowScene = (UIWindowScene *)scene;
        self.window = [[UIWindow alloc] initWithFrame:UIScreen.mainScreen.bounds];
        [self.window setWindowScene:windowScene];
        ViewController *vc = [ViewController new];
        UINavigationController *nvc = [[UINavigationController alloc] initWithRootViewController:vc];
        self.window.rootViewController = nvc;
        [self.window makeKeyAndVisible];
    }
}

@end
- 运行app,结果如下图。
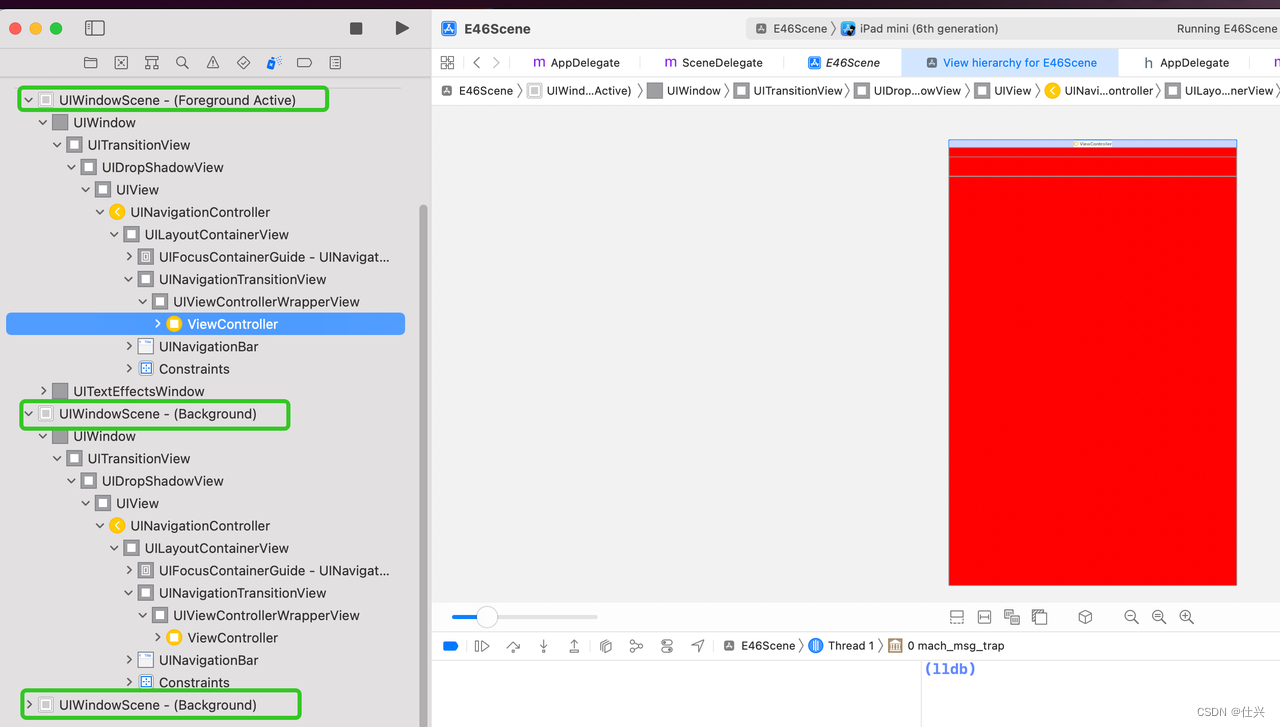
- 我们让app支持多窗口功能,然后运行app,接着添加窗口。

- 此时看看app的UI层级图,发现此时一个有3个窗口(UIWindowScene)。
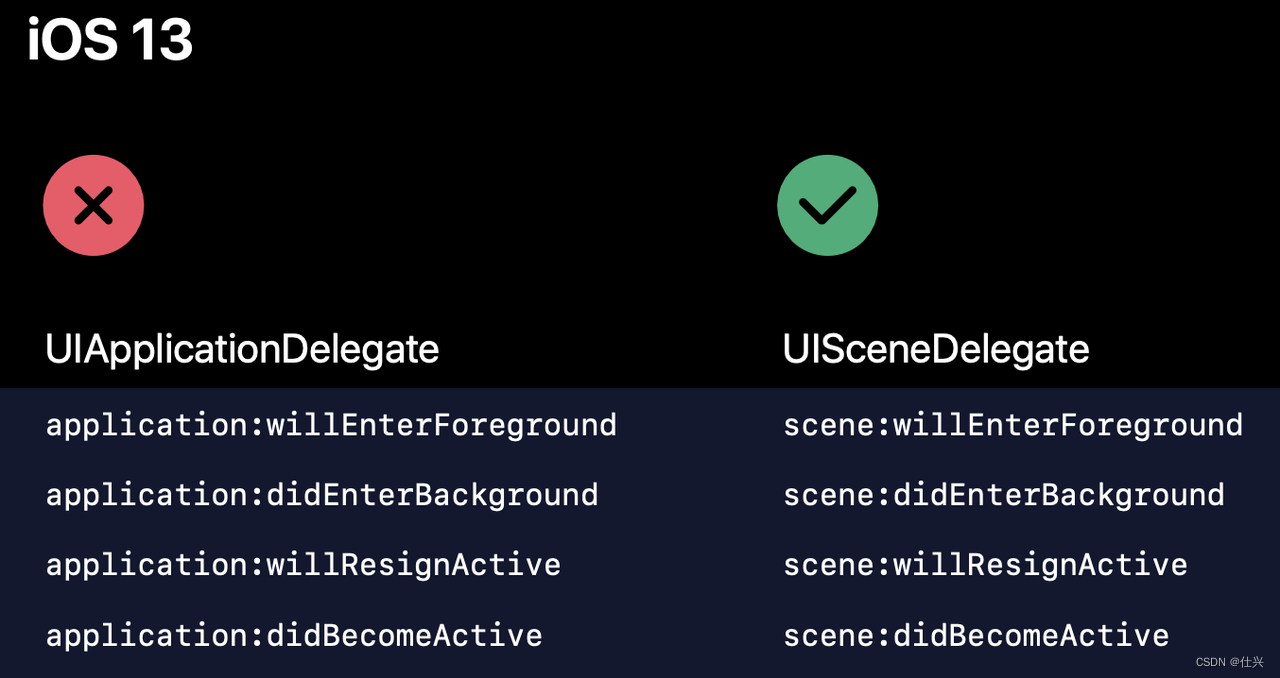
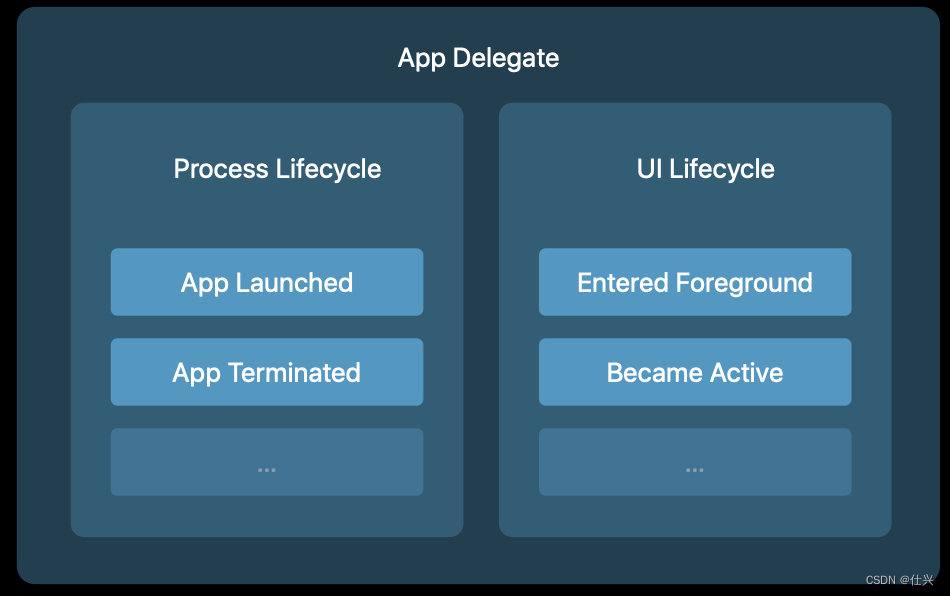
ios13后的AppDelegate的职责发生了变化
ios13之前
如下图,ios13之前的Appdelegate职责有:1 进程生命周期相关的回调(比如application:didFinishLaunchingWithOptions:方法); 2 UI的生命周期相关的回调(比如applicationDidBecomeActive:方法)。
ios13之后
如下图,ios13之后,AppDelegate负责进程生命周期相关和UISceneSession生命周期相关的回调。而UI的生命周期相关的回调则由UISceneDelegate来负责。